Overview
There might be situations when you need to step away, go on vacation, or redirect contacts to another communication channel. This is where an Auto-Reply workflow comes handy. It processes incoming messages and reacts to them accordingly — like sending a notice that you’ll return in two weeks, or instructing them to check your updates on a different platform.
This guide will help you set up a workflow that enables you to send predefined messages to specific users or even to all users, except the ones you specify. It provides a customizable skeleton that can be enhanced according to your specific needs.
Whether you prefer to build your own workflow or directly download and import our pre-designed workflow file, here you go: TelePilot__Auto_Reply
The n8n Workflow
Here’s a list of the nodes we’ve used for this workflow:
- Telegram Trigger: The core TelePilot node that receives messages and events from Telegram.
- IF: Checks for specific conditions.
- Wait: Pauses the workflow for a specific amount of time.
- Telepilot Get User: Retrieves the username of the message sender.
- Telepilot Send Message: Sends a reply message to a specific user or chat.
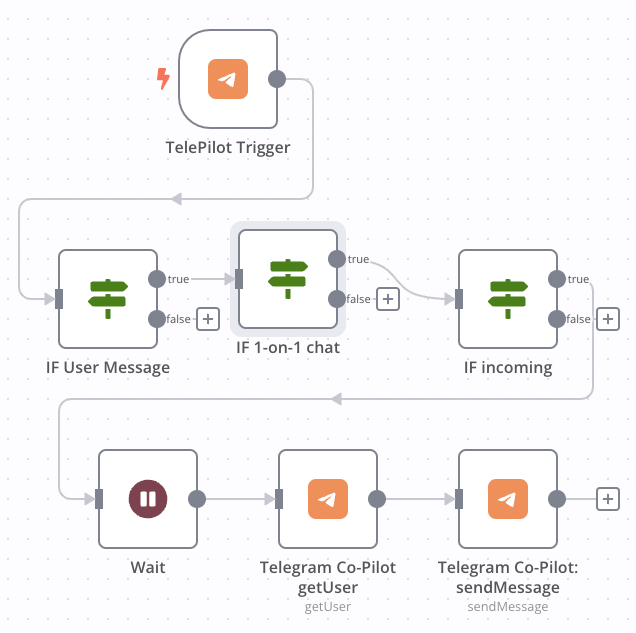
Below are the step-by-step procedures on how to configure each node in the workflow.
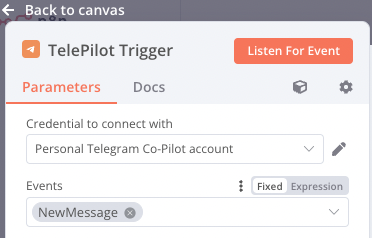
Telepilot Trigger Node
The Telepilot Trigger node uses the Napi::AsyncWorker to continually execute the tdlib’s td_json_client_receive method. It ensures the node captures and delivers all events, or specific events based on your preference.
To receive all incoming Telegram messages, you need to:
- Add the Telepilot Trigger node to the canvas
- Set the
Eventsfield toNewMessagein the node configuration
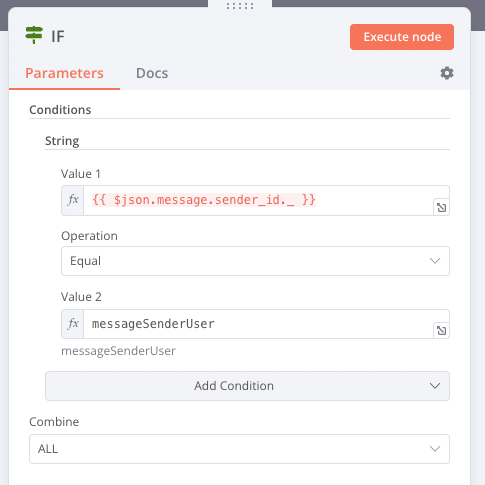
IF Message from User
The IF node serves as a fork in the workflow, with one input and two outputs: “True” and “False”. Depending on the results of the conditions checked within the IF node, either the “True” or “False” output is activated.
In this case, the IF node is used to confirm that a message has been sent by a user, not a channel.
Here are the configuration steps:
- Add a new
Stringcondition. - Insert
{{ $json.message.sender_id._ }}Expression into theValue 1field of the newly created condition. - Enter
messageSenderUserinto theValue 2field.
IF 1-on-1 Chat
Second IF node verifies that a message is a direct message. This is true when the user_id of the sender is the same as the chat_id of the chat where the message has been sent.
To configure IF node for this, you would need to:
- Add a new
Stringcondition - Put
{{ $json.message.sender_id.user_id }}Expression intoValue 1field of the new condition - Put
{{ $json.message.chat_id }}inValue 2field

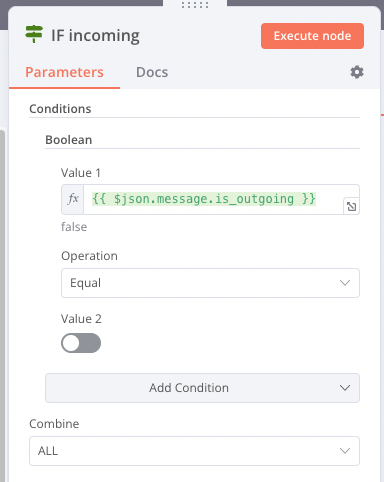
IF Incoming Message
Telegram servers dispatch lots of events - there’s one for practically every action. For instance, when you send a message, you’ll receive an event containing the same message. Technically, you are not only sending but also receiving your messages.
When building an auto-reply workflow, it doesn’t make much sense to send automatic replies to your own messages. This could potentially lead to endless loops of the n8n workflow repeatedly sending the same message.
Thankfully, the Telegram protocol offers a way to differentiate whether a message was sent by us or received from another user. This is where the is_outgoing flag of the message comes into play.
To avoid sending automatic replies to your own messages, this IF node evaluates the is_outgoing flag of the message.
Here are the configuration steps:
- Add a new “Boolean” condition
- Insert
{{ Boolean($json.message.is_outgoing) }}Expression intoValue 1field of the new condition - Switch
Value 2field to “Expression” mode and enter{{ false }}
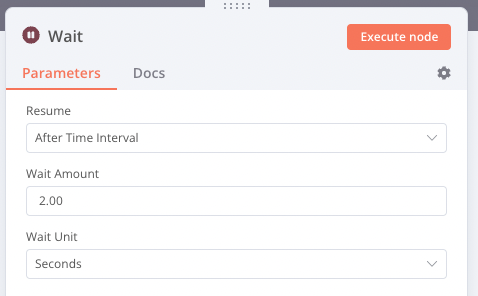
Wait Node
The Wait node pauses the workflow for a specified amount of time to create a more natural interaction and prevent message overflow.
Here is how you configure “Wait” node to take a small pause:
- Leave
Resumefield withAfter time intervalvalue - Put
2.00inWait Amountfield - Change
Wait Unitfield toSeconds: we do not want to wait for too long (but we can! :))
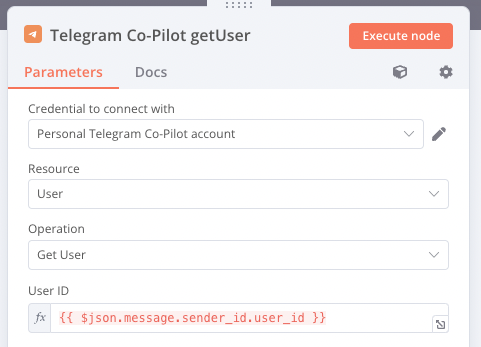
Telepilot Get User Node
Personalizing your auto-reply can make a significant difference in how your message is received. The possibilities for personalization are limitless:
- You could create a sub-workflow that searches for information about your contact on Google or fetches data from their LinkedIn profile.
- You could access your communication history with the contact and use GPT-4 to compose a response based on it. We’ll delve into this in the Integrate Telegram with ChatGPT and OpenAI workflow.
- You could automatically check specific public Telegram groups, collect messages that your contact has written there, and compose your answer based on these messages.
In our current example, we’ll keep things simple and retrieve the username of our contact from the Telegram servers by providing their ID. Here’s how you can use the Get User node to get a Telegram username by user_id:
- Enter the expression
{{ $json.message.sender_id.user_id }}into theUser IDfield of the node configuration.
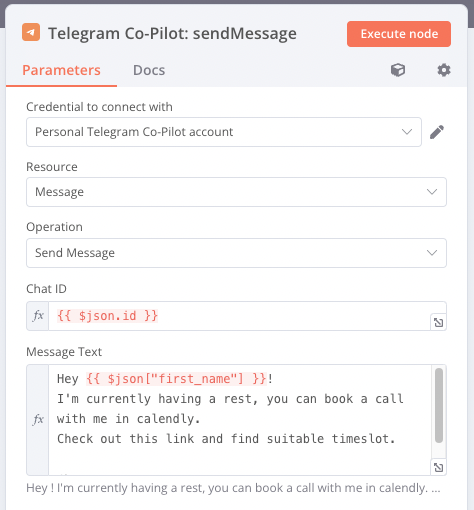
Telepilot Send Message Node
The final step is to send a message. Typically, you need two things for this:
- What to send, i.e., your message or a template filled with personalized values.
- Whom to send it to, i.e., the
user_idof the recipient.
Follow these steps to set up the “Send Message” node:
- Enter the expression
{{ $json.id }}in theChat IDfield to specify the recipient. - For the message, we will use a simple template that invites your counterpart to directly book a meeting with you. Here’s a sample template:
Hey {{ $json["first_name"] }}!

I'm currently on a break. If your matter is of importance, please book a call with me on Calendly.
Find a suitable timeslot using this link: https://my-personal-calendly-link

Cheers!
Testing Your Workflow
To test your workflow, follow these steps:
- Activate your workflow.
- Ask a friend to send you a direct message on Telegram.
By doing so, you can verify if your autoresponder is working as expected.
Wrapping Up
In this post, we’ve covered how to set up a Telegram autoresponder using Telepilot, n8n’s visual editor. You learned how to handle incoming messages, personalize responses, and manage the flow of communication, creating an efficient, automated interaction with your Telegram contacts.
This is just one example of the powerful workflows that can be built with Telepilot. The possibilities are vast and limited only by your imagination.
If you encounter any challenges or need help customizing your workflows, we’re here to help. Please don’t hesitate to reach out.
Join our Telegram channel to stay updated with the latest news, features, and helpful tips. We’re looking forward to seeing what incredible workflows you create!
Happy automating!